A recent spurt of inventiveness led me to carry out a couple of baking experiments that by some miracle came out out nicely. To be truthful I can’t really credit a capacity for creativity when in actuality it was more a matter of laziness – I simply couldn’t be bothered browsing through recipes and making trips back to the supermarket, when on both occasions I was passing the supermarket on the way home from work.
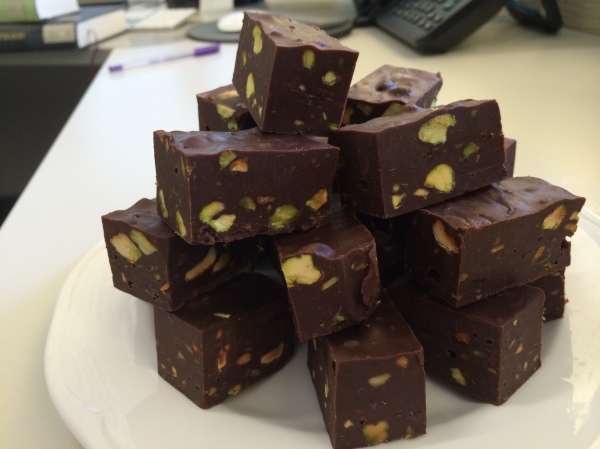
For this first one I had a basic recollection of a fudge recipe, and so knew what I needed and what I had at home. And while making it I decided to improvise a little, and the result – Salted Chocolate Pistachio Fudge. Here’s the recipe:
Salted Chocolate Pistachio Fudge
1 cup shelled pistachios, coarsely chopped
250g dark cooking chocolate
250g dark chocolate melts
395g can sweetened condensed milk
65g butter
Malden sea salt flakes
Melt the chocolate, condensed milk and butter in a small saucepan over a low heat, stirring until completely smooth and combined. Add the pistachios, and then sea salt to taste (I used about 1 scant tablespoon).
Pour the mixture into a 20cm square cake tin lined with foil and smooth it out as best you can. Work quickly as it stops being spreadable pretty quickly as it cools. Refrigerate until set. Cut into 1″ squares.
The basic fudge recipe comes from an old Christmas Recipes book put out by Family Circle, and even without the salt is a sure hit. But be warned, it is so rich you can’t eat more than one square at a time (I know this for certain, I’ve tried!).
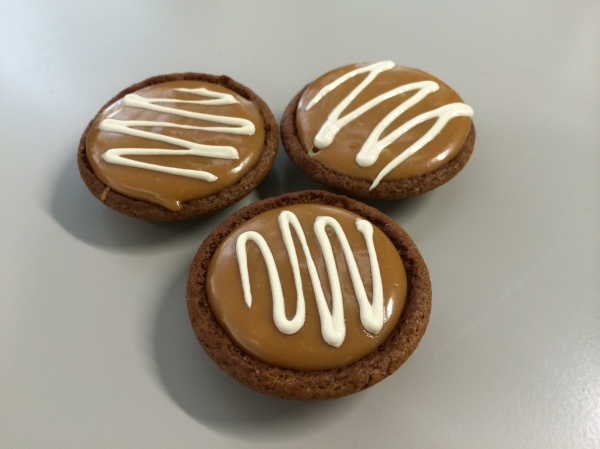
These sweet and sticky beauties I came up with from scratch as I wandered around the supermarket looking for inspiration. I call them Caramel Ginger Pods. My Mum once made a recipe that used Arnott’s Gingernut Biscuits as a ready made casing for some sort of lime and cream cheese filling. I was taken by the simplicity of the concept but quite unhelpfully, Mum had no recollection of it whatsoever.
I knew, though, that you had to heat the biscuits in the oven, sitting in a round-base patty tin, to soften them. But for how long, and at what temperature, I knew not. But I thought I’d give it a go anyway. I wanted to do a gooey caramel filling instead of cream cheese, and thought immediately of Nestlé’s Top ‘n’ Fill Caramel. I took inspiration from a recipe on the back of the can, which combined the caramel with white chocolate melts.
(The appearance here in this blog post of two related products that sit side by side on the supermarket shelf – Sweetened Condensed Milk, and Top ‘n’ Fill – is purely coincidental!)
Back at home I had a vague inkling that I might in fact have had a recipe somewhere that used the Gingernut technique for its base. My memory served me well and I found the recipe in a little Women’s Weekly /CSR recipe book called Cakes, Biscuits and Slices. The amazing thing is the recipe was called Caramel Meringue Pies! The difference was that it required Butternut Snap Biscuits, and used Top ‘n’ Fill on its own as the filling. Plus I wasn’t doing a meringue topping. So I now had the oven temperature and time, and the rest is history. Here’s my recipe:
Caramel Ginger Pods
250g packet Gingernut Biscuits
380g can Top ‘n’ Fill Caramel
1 cup white chocolate melts
1 tube white chocolate writing fudge (alternatively use melted white chocolate and a piping bag)
Preheat oven to 160C. Place one biscuit in each hole of a 12-hole round-based patty pan and bake for about 10 minutes, or until the biscuits feel soft. Immediately on removing the biscuits from the oven, press each one down into the patty pan hole to make them into a concave shape, and allow to cool.
Meanwhile melt the Top ‘n’ Fill and white chocolate in a small saucepan and stir until smooth. Spoon the filling into each cooled biscuit cup and refrigerate until cool. To finish off put a squiggle of the writing fudge on top of each.
Tip #1: I found the Gingernuts had a tendency to try to revert to their flattened shape when I pressed them down with a spoon. A much more effective measure turned out to be pressing them down with the large marble mortar from my mortar and pestle, which exactly matched the size of the biscuits. Be quite firm.
Tip #2: Butternut cookies could work as well for the bases.
Tip #3: You could try substituting caramelised Sweetened Condensed Milk for Top ‘n’ Fill if you can’t find it, but there’s obviously a little more work involved in boiling the can of condensed milk to caramelise it.
Tip # 4: Like the fudge, they are rich and sweeeeet!
Now finally, a word about the title of this post. Toothsome is an old-fashioned word you don’t hear much these days, but which I had always thought described a figure with prominent teeth, as in the minion below that I recently made out of sugarpaste. In fact it is an adjective to describe something delectable or appealing in appearance. You live and learn…
